
PAINT CHALKING – CAUSES, PREVENTION, AND HOW TO IDENTIFY & FIX
Paint Chalking – Causes, Prevention, and How to Identify & Fix
When it comes to maintaining the exterior of your home, one of the challenges that can arise is paint chalking. Paint chalking is a phenomenon where the paint on a surface starts to break down into a powdery, chalk-like residue. This not only affects the aesthetic appeal of your property but also indicates potential underlying issues. In this article, we will delve into the causes of paint chalking, how to prevent it, and the steps to identify and fix this problem.
Causes of Paint Chalking:
Several factors contribute to the occurrence of paint chalking:
- Age and Quality of Paint: Over time, exposure to the elements causes the binder in the paint to degrade. Low-quality paints or paints with insufficient binders are more prone to chalking.
- UV Radiation: Ultraviolet (UV) rays from the sun can cause the pigments and binders in paint to deteriorate, leading to chalking.
- Moisture and Humidity: High levels of humidity and moisture can weaken the paint film, facilitating the breakdown of binders and pigments.
- Airborne Pollutants: Airborne pollutants, such as car exhaust and industrial emissions, can react with the paint and accelerate chalking.

Prevention of Paint Chalking:
While paint chalking is inevitable to some extent, there are steps you can take to minimize its occurrence:
- Quality Paint Selection: Opt for high-quality paints that contain sufficient binders and pigments to withstand outdoor conditions.
- Surface Preparation: Properly clean and prepare the surface before painting. This includes removing dirt, dust, and old chalking paint.
- Primer Application: Applying a primer helps create a strong bond between the surface and the paint, reducing the likelihood of chalking.
- Regular Maintenance: Periodically inspect your painted surfaces for signs of chalking and address the issue before it becomes extensive.
Identifying Paint Chalking:
Identifying paint chalking is relatively straightforward:
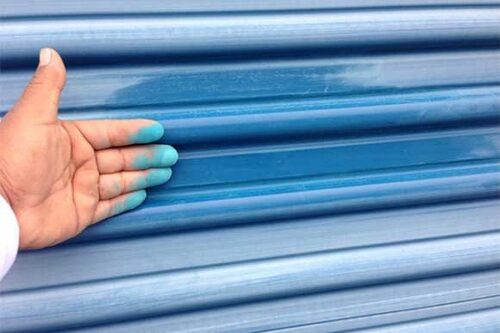
- Touch Test: Run your fingers over the painted surface. If you notice a chalky residue on your fingertips, chalking is occurring.
- Visual Inspection: Look for a powdery or chalky appearance on the paint surface. The color might appear faded, and the surface may have a dull sheen.
- Rub Test: Rub a cloth or your hand over the paint. If you see a substantial amount of chalky residue on the cloth, it’s a clear sign of chalking.
Fixing Paint Chalking:
To address paint chalking, follow these steps:
- Cleaning: Thoroughly clean the chalking surface to remove all loose chalk and dirt. A mixture of water and mild detergent can be used.
- Scraping: Use a paint scraper to gently remove the remaining chalking paint. Sand the surface lightly to create a smooth canvas for repainting.
- Priming: Apply a high-quality primer to the prepared surface. This will improve paint adhesion and overall durability.
- Repainting: Choose an exterior paint with UV protection and high binder content. Apply at least two coats for even coverage.
- Sealing: Consider applying a clear sealant over the new paint to provide an extra layer of protection against the elements.
Paint chalking might seem like a minor issue, but it’s essential to address it promptly to prevent further paint deterioration and to maintain the visual appeal of your property. By understanding its causes, taking preventive measures, and following proper remediation steps, you can ensure that your home’s exterior remains vibrant and well-protected for years to come.